
React is still one of the most popular front end Javascript libraries around. According to the annual Stack Overflow Developer Survey, React is the most popular front end library for building interfaces and the second most popular web framework overall.
Even more impressive is that its popularity continues to grow year-over-year.
How come React continues to be so popular (and wanted) amongst developers when so many competitors have tried to dethrone it over the past few years?
The full answer to that question can get very technical, so I'll do my best to make it short and sweet.
First, React's virtual DOM is fast and efficient. Second, the declarative JSX syntax is easy to learn and features programming patterns that developers find familiar.
These benefits make React ideal for a variety of application types. Furthermore, individuals and small teams continue to choose React for their web apps.
A common requirement for modern web applications is a backend database to serve and query real-time data. The traditional implementation of a backend database can often be quite precarious and cost-ineffective.
Thankfully, over the past five years, serverless technology has come to the forefront of modern application development.
In this context, serverless means that the developer doesn't have to set up and administer an actual server to host their database and other backend services. Rather, they use a secure provider to host their backend and connect to it directly from the front end application code. No need to worry about scalability and systems.
This application architecture is relatively new, but it's cost-effective and dramatically increases productivity. These benefits play well to those using React to build modern, production applications. Plus, services like Easybase have created serverless libraries built specifically for stateful React components.
This article will demonstrate how easy it is to use the easybase-react library to implement a stateful, serverless database in a new React project. The below example will be a straightforward note-taking app, but serverless architecture has the potential to streamline all sorts of applications.
Table of Contents:
- How to Initialize React Project & Components
- How to Set Up the Serverless Database
- Mutable Database array
How to Initialize React Project & Components
To create a new React project, I'm going to use the popular create-react-app library (make sure you have Node installed on your machine).
To those not familiar with manually setting up a React project, I suggest using this library as it will create a blank, properly-configured project.
Execute the following command where you want your new project to be created:
npx create-react-app serverless-database-appAfter that completes, let's install the serverless library:
cd serverless-database-app && npm install easybase-reactFinally, we can start the project:
npm run startYour application will automatically open in your default browser. The root component that you see is in src/App.js and this is where the main changes will be made.
Before we get into the serverless provider, I'm going to simplify the code in App.js. We'll have two components: App and Cards. App.js will now look like the following:
import './App.css';

function App() {
  return (
    <div className="App" style={{ display: "flex", justifyContent: "center" }}>
      <Notes />
    </div>
  );
}

function Notes() {
  const backendData = [
    { title: "Grocery List", description: "Milk, Soup, Bread", createdat: "01-18-2021" },
    { title: "Math Homework", description: "Remember to finish question 8-10 before monday", createdat: "12-01-2020" },
    { title: "Call James", description: "Ask him about the company party.", createdat: "12-30-2020" }
  ]

  const noteRootStyle = {
    border: "2px #0af solid",
    borderRadius: 9,
    margin: 20,
    backgroundColor: "#efefef",
    padding: 6
  };

  return (
    <div style={{ width: 400 }}>
      {backendData.map(ele =>
        <div style={noteRootStyle}>
          <h3>{ele.title}</h3>
          <p>{ele.description}</p>
          <small>{ele.createdat}</small>
        </div>
      )}
    </div>
  )
}

export default App;
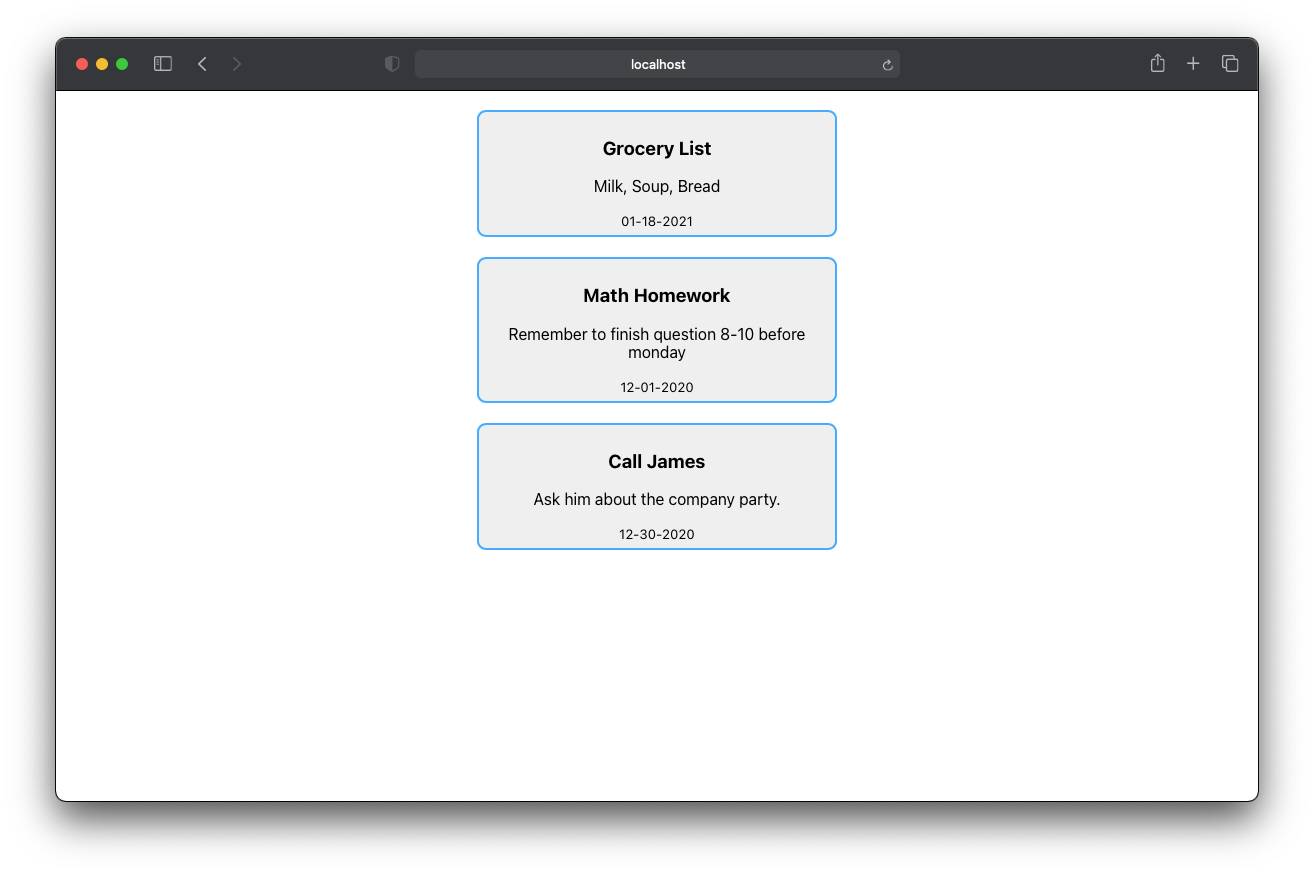
I added some example data called backendData, but we'll replace this with a real-time database in the next step. Here's a screenshot of my current implementation for reference:
For the sake of brevity, the styling of this application will be very rudimentary. But you should definitely give your own application a unique look and feel!
How to Set Up the Serverless Database
There are many general serverless backend providers around (AWS, Google Cloud, and so on). Variance exists between the functionality of these providers. Some are better suited for, perhaps, mobile applications or parallel processing or machine learning, and so on.
I'm going to use Easybase because their platform features a React-specific library that is built for serverless applications. We'll see below how quick and easy this package is set up in code.
I've used this platform for multiple projects and by far the most valuable aspects of easybase-react are the automatic session caching and secure data fetching. Implementing these modules manually is a major hassle and can be a whole project within itself.
To start, we are going to make two changes to App.js. First, let's use that easybase-react package that we installed earlier by adding an import line to the top of App.js. Bring in EasybaseProvider and useEasybase.
Second, Wrap the Notes component in the EasybaseProvider component.
App.js should now look as follows. Note that I also brought in the useEffect hook from React.
import './App.css';
import { EasybaseProvider, useEasybase } from 'easybase-react';
import { useEffect } from 'react';

function App() {
  return (
    <div className="App" style={{ display: "flex", justifyContent: "center" }}>
      <EasybaseProvider>
        <Notes />
      </EasybaseProvider>
    </div>
  );
}

// ...
The EasybaseProvider component will give all children components valid access to the useEasybase hook, once we pass in the required configuration.
EasybaseProvider has a prop called ebconfig which is a single file that authenticates and secures all connections from within our React project.
Here's how we can get an ebconfig token associated with a custom data table:
- Login to Easybase or create a free account
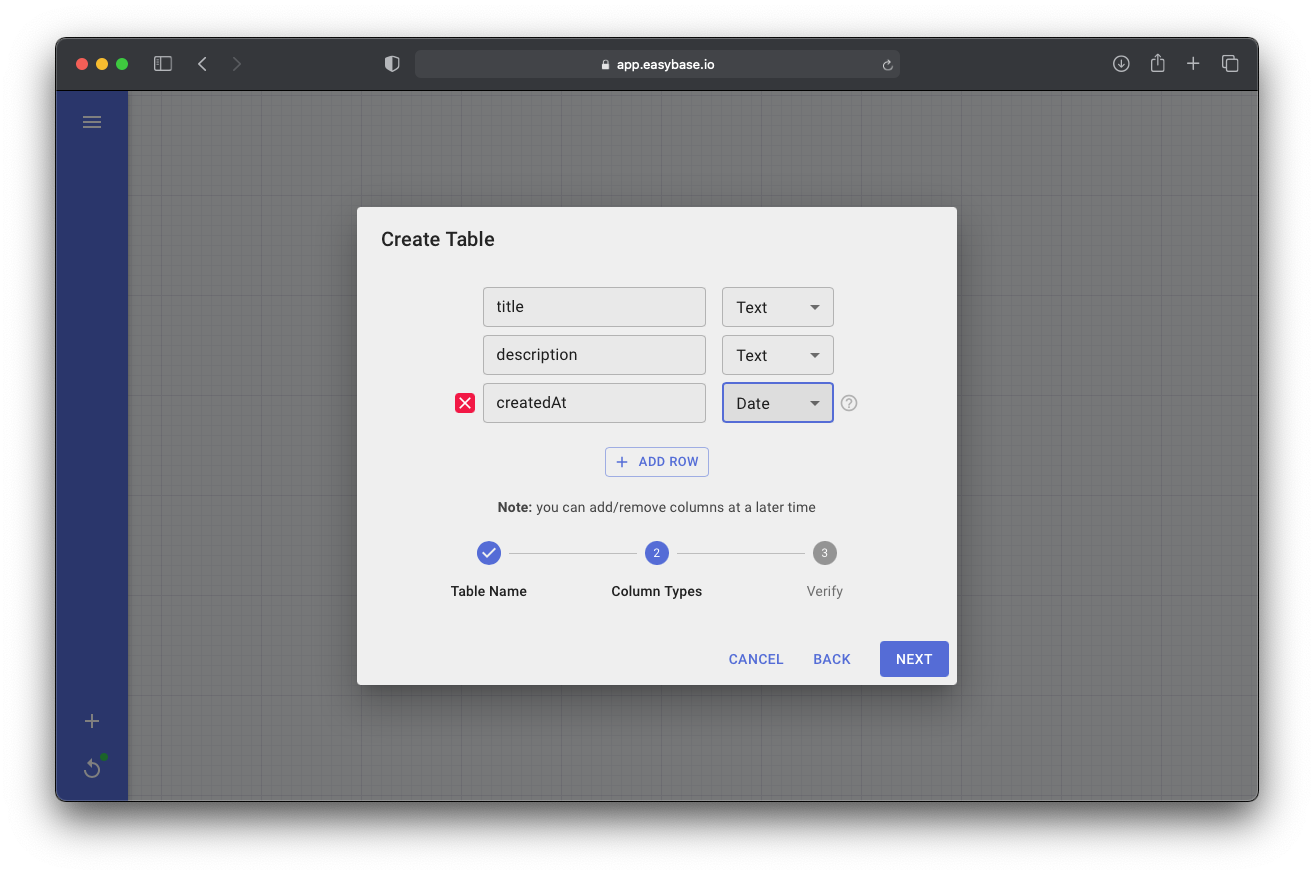
- Open the Create Table dialog via the '+' button in the bottom-left button group
- Give your table a name and make columns that correspond to those of the example array (title, description, createdat)
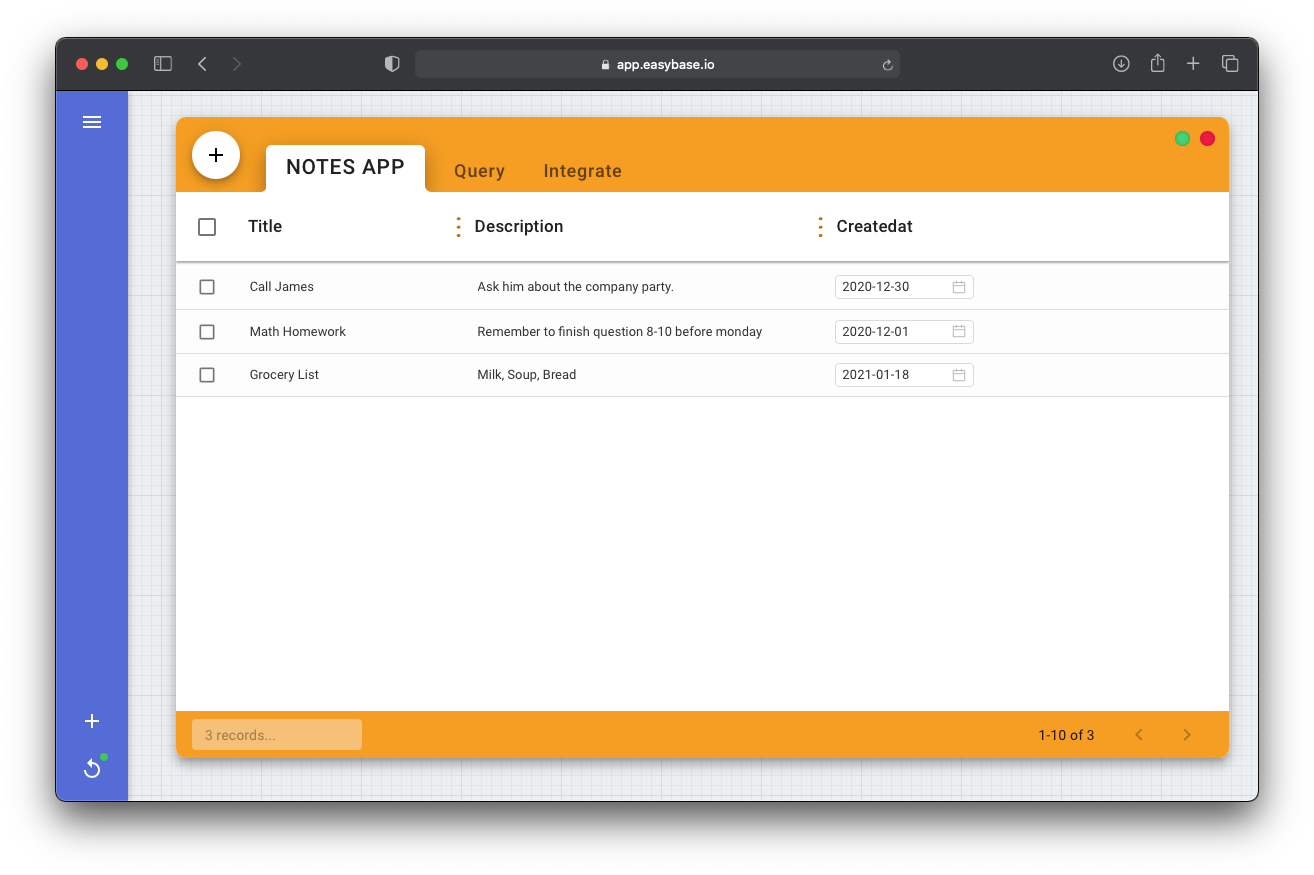
I'm going to manually add the example rows from the backendData array for reference, but this step is not necessary.
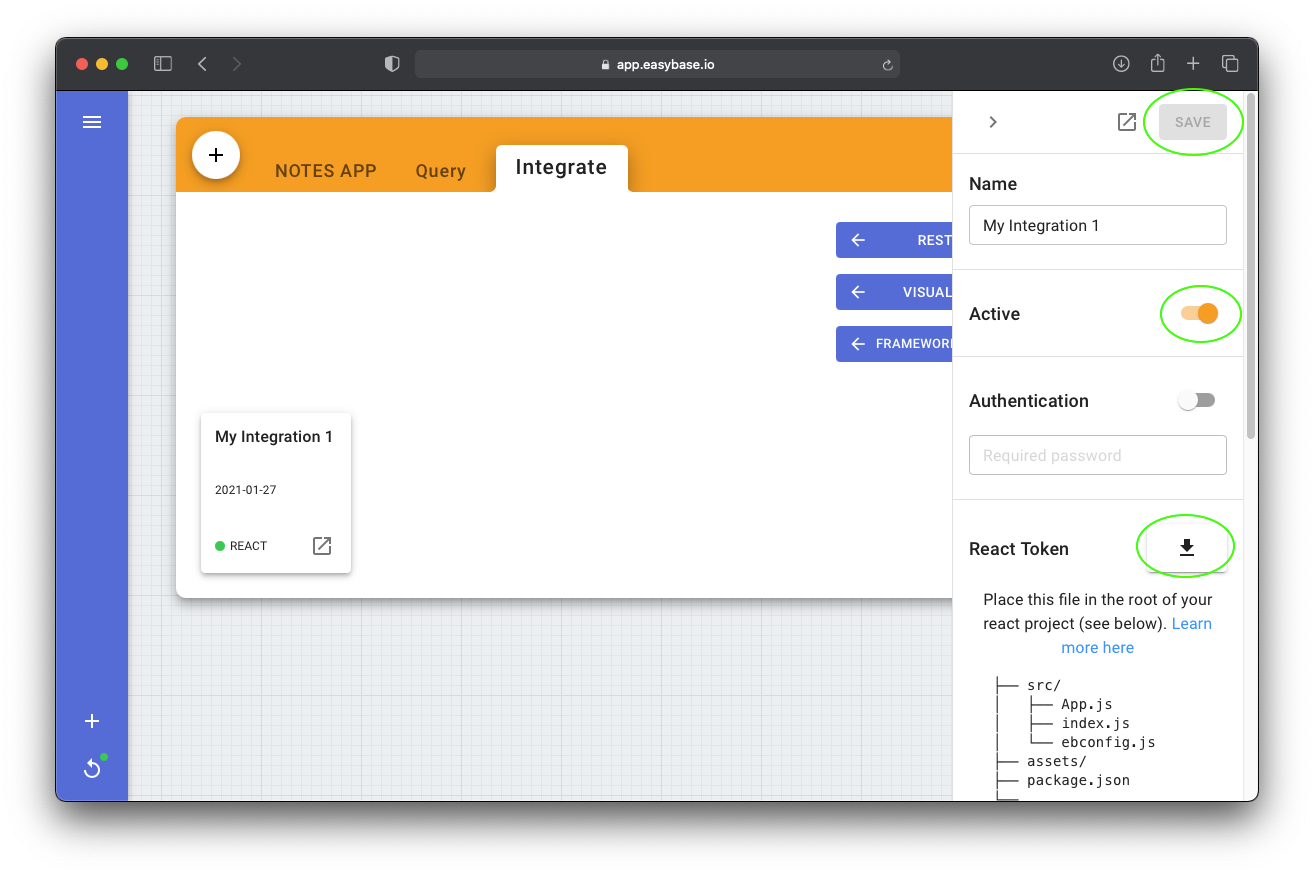
- Navigate to Integrate tab and create a new React integration
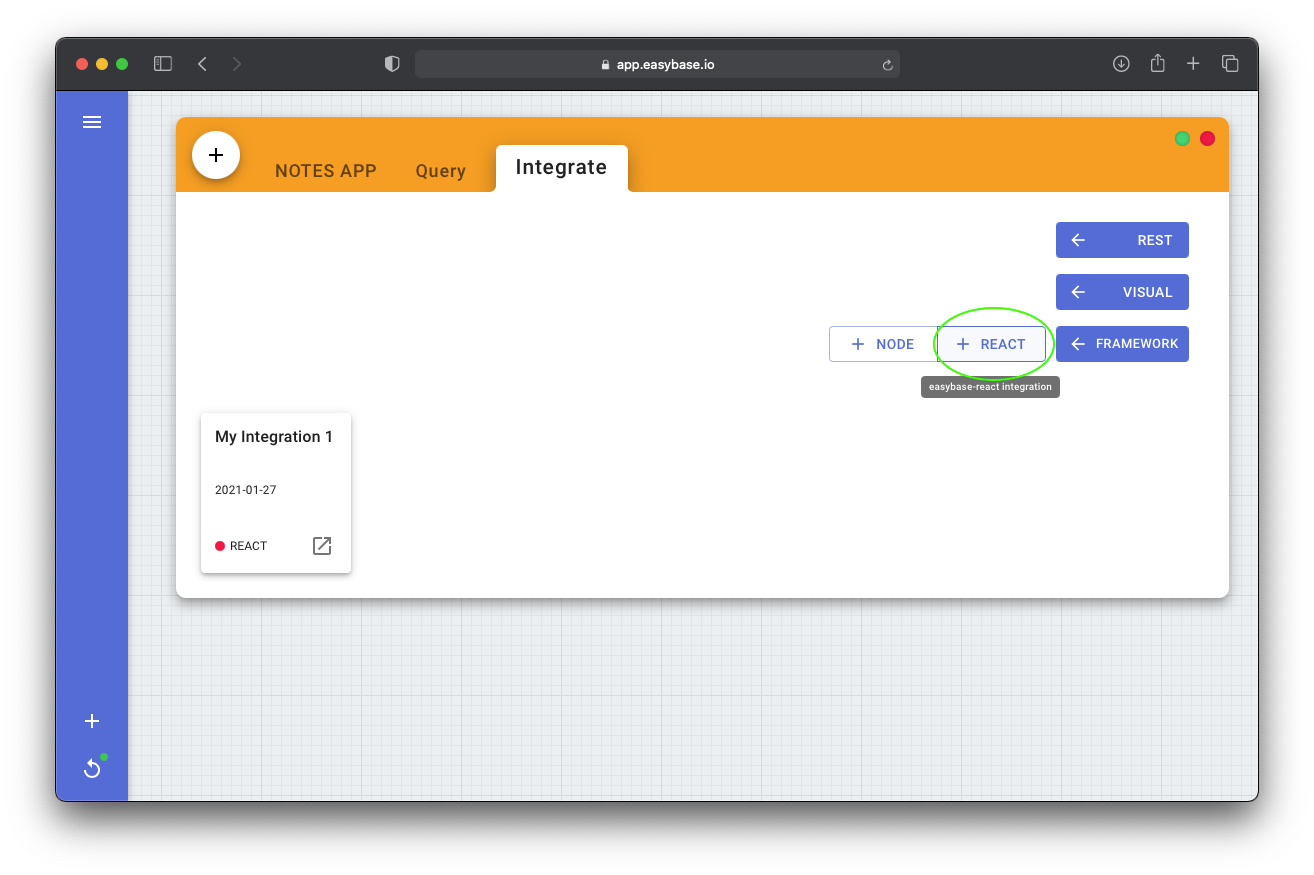
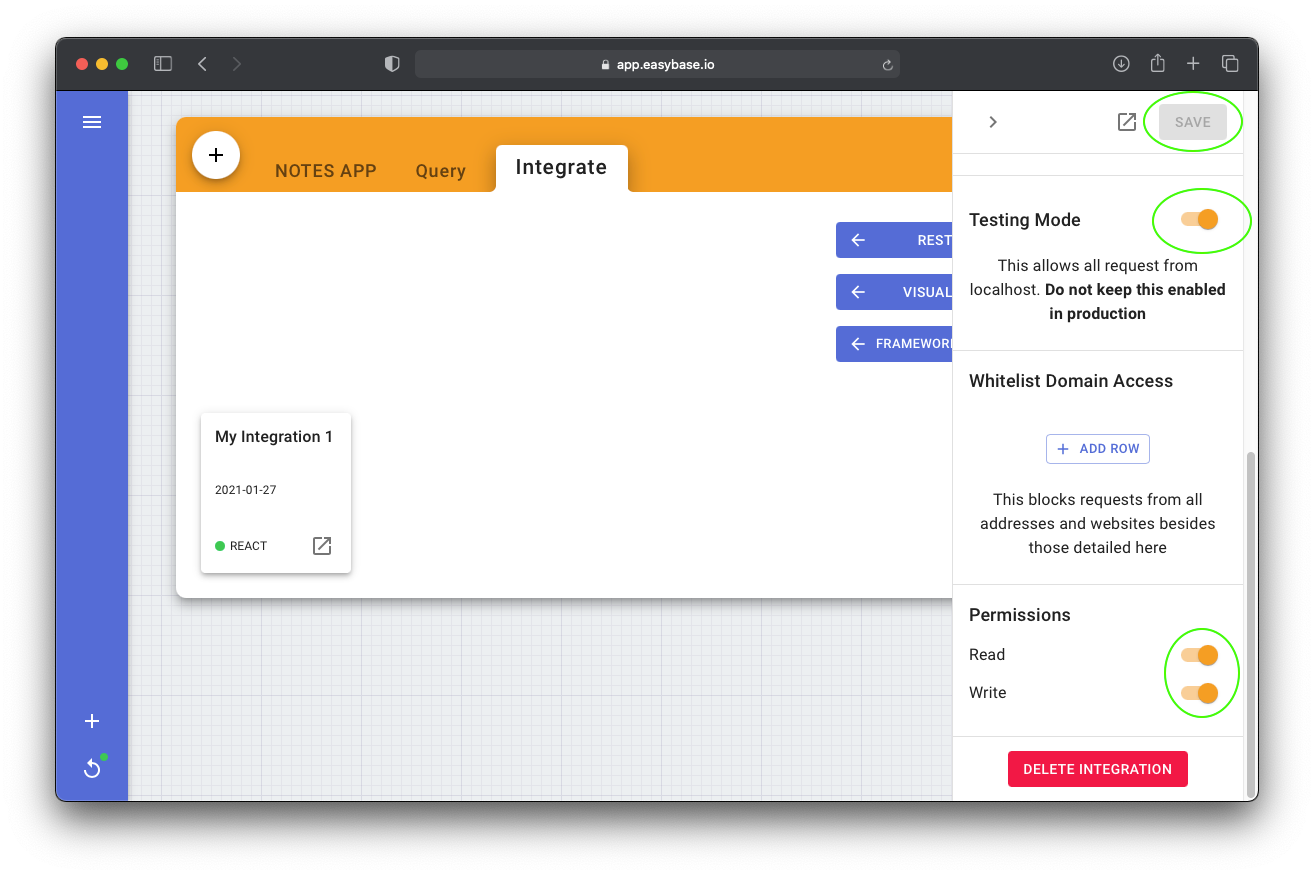
- In the right-hand drawer, enable Active, Testing Mode, and read and write in Permissions. Then download the React token and click Save in the top-right
- Place the newly downloaded ebconfig.js file within the
src/folder of your project
├── README.md
├── node_modules/
├── package.json
├── public/
└── src/
    ├── ebconfig.js   <---
    ├── App.css
    ├── App.js
    ├── index.css
    ├── index.js
└── ...- Finally, import this file into
App.jsand pass it as theebconfigprop of EasybaseProvider like so:
import './App.css';
import { EasybaseProvider, useEasybase } from 'easybase-react';
import { useEffect } from 'react';
import ebconfig from './ebconfig';

function App() {
  return (
    <div className="App" style={{ display: "flex", justifyContent: "center" }}>
      <EasybaseProvider ebconfig={ebconfig}>
        <Notes />
      </EasybaseProvider>
    </div>
  );
}

// ...
Just like that, our project is configured for serverless functionality. All that's left to do is utilize the functions provided by the useEasybase hook, which we'll do in the next section.
If your project is to handle individual users with secure login authentication, use the Projects tab rather than a simple React integration.
Mutable Database Array
Now that we have properly set up our backend, the child components of EasybaseProvider can access the useEasybase hook. This hook provides the essential functions needed to access our remote data.
Let's start by bringing in three functions; configureFrame, sync, and Frame, in our Notes component with const { Frame, sync, configureFrame } = useEasybase();.
When our component first mounts we want to configure our Frame to get the first 10 entries of our database, NOTES APP. Frame acts as a stateful database array in which calling sync will normalize any local changes with changes in the backend database.
function Notes() {
  const { Frame, sync, configureFrame } = useEasybase();

  useEffect(() => {
    configureFrame({ tableName: "NOTES APP", limit: 10 });
    sync();
  }, []);

  const noteRootStyle = {
    border: "2px #0af solid",
    borderRadius: 9,
    margin: 20,
    backgroundColor: "#efefef",
    padding: 6
  };

  return (
    <div style={{ width: 400 }}>
      {Frame().map(ele =>
        <div style={noteRootStyle}>
          <h3>{ele.title}</h3>
          <p>{ele.description}</p>
          <small>{String(ele.createdat).slice(0, 10)}</small>
        </div>
      )}
    </div>
  )
}
Sync will automatically handle the backend processes necessary. More importantly, it will re-render our component with the fresh data in Frame.
If we rebuild our application, the new notes displayed will be the same ones present in our data table. Congrats, you're using a serverless database!
Let's have some more fun by adding a button that will push a new note to Easybase and render your application accordingly.
Create a new component called NewNoteButton. Get the sync and Frame functions from the useEasybase hook.
I'm going to place this button in the top-left of the window using absolute positioning. When a user clicks this button, my component will get a new title and description from the user and post it to Easybase using Frame and sync.
Put this newly created component below the Notes component within the EasybaseProvider.
function App() {
  return (
    <div className="App" style={{ display: "flex", justifyContent: "center" }}>
      <EasybaseProvider ebconfig={ebconfig}>
        <Notes />
        <NewNoteButton />
      </EasybaseProvider>
    </div>
  );
}

// ...

function NewNoteButton() {
  const { Frame, sync } = useEasybase();

  const buttonStyle = {
    position: "absolute",
    left: 10,
    top: 10,
    fontSize: 21
  }

  const handleClick = () => {
    const newTitle = prompt("Please enter a title for your note");
    const newDescription = prompt("Please enter your description");

    Frame().push({
      title: newTitle,
      description: newDescription,
      createdat: new Date().toISOString()
    })

    sync();
  }

  return <button style={buttonStyle} onClick={handleClick}>📓 Add Note 📓</button>
}
My implementation gathers the user's desired title and description via the native prompt function, but your production app will likely require a more robust input solution. This will work just fine for a demonstration, though.
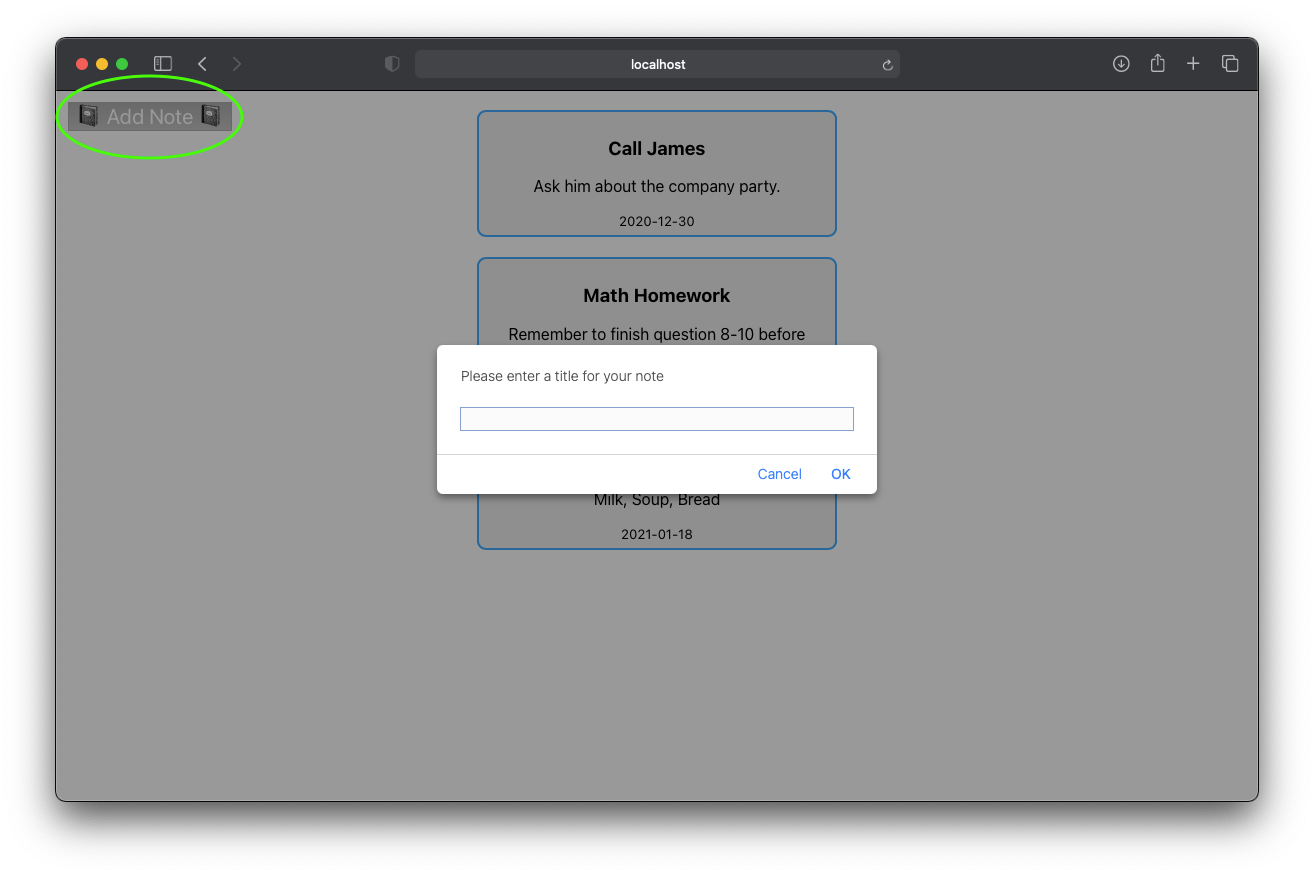
Notice the new button in the top right corner of the screen. Clicking this will bring up two text boxes. After completion, the Notes component re-renders after the sync call which displays your new entry.
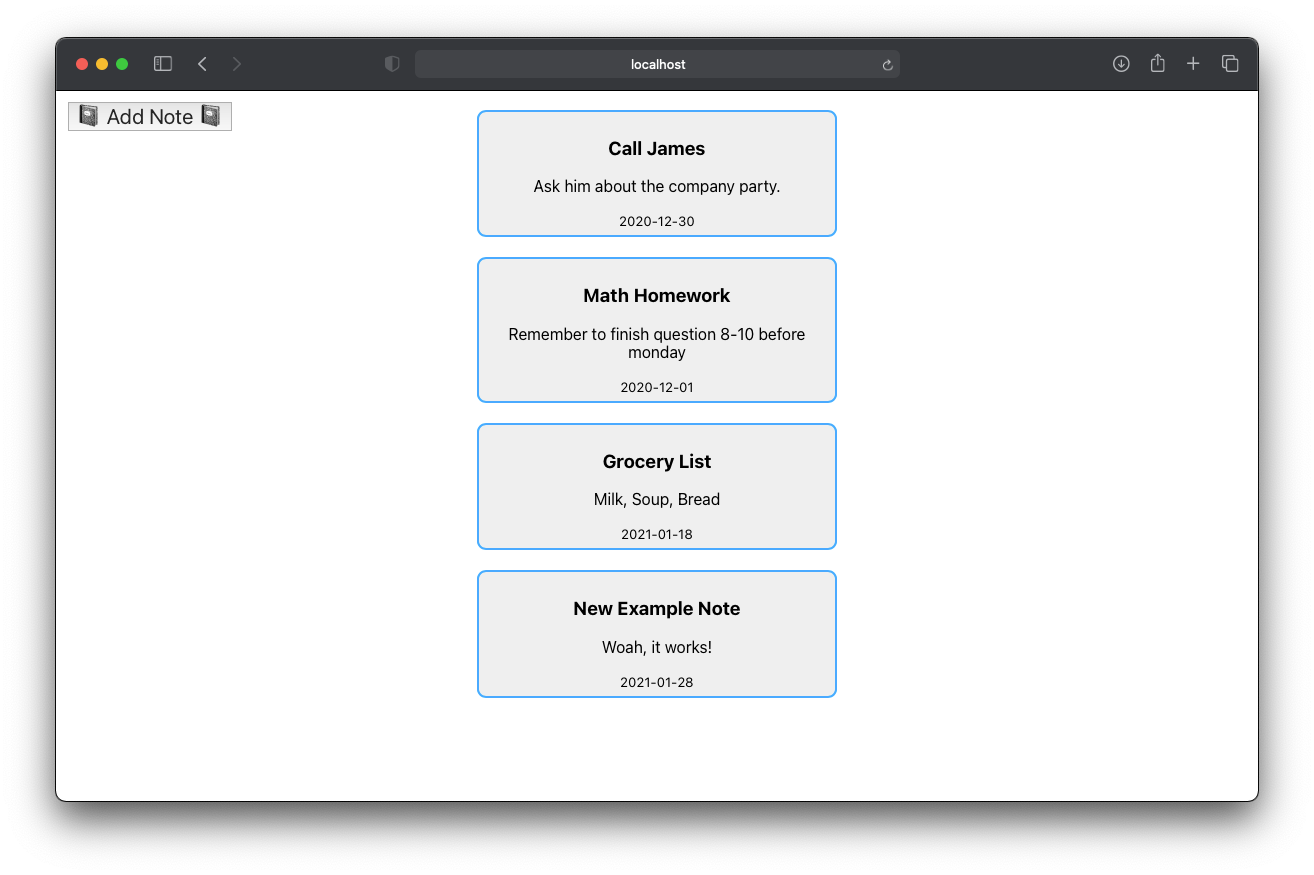
These changes will be instantly visible in your Easybase table, so feel free to make changes there as well!
Conclusion
The numbers don't lie – React is robust, mature, and loved by developers. The open-source community has really embraced the project, with over 1500 contributors.
This library has proven to be one of the best ways to create beautiful, high-performance interfaces. In fact, you can even deploy your React project right to Github Pages.
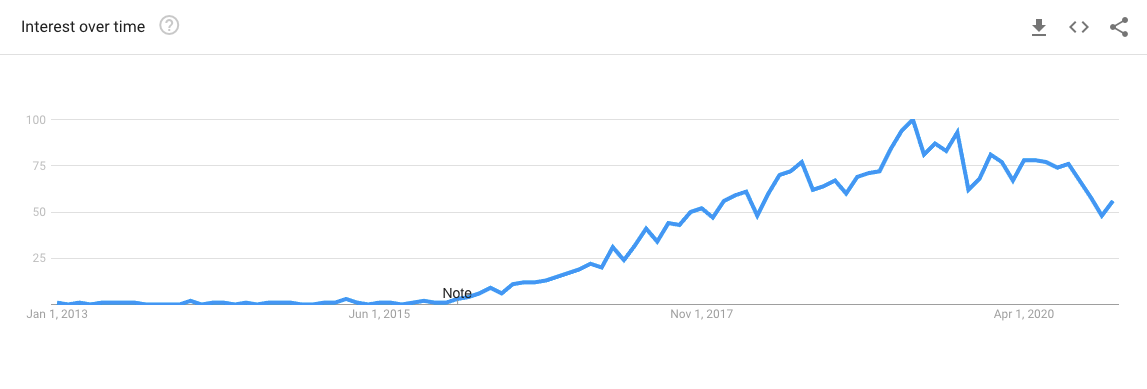
Using React with serverless has become a no-brainer. The adoption of this scalable technology has grown greatly. Take a look at the Google Trends chart for the term "serverless" over the past 8 years.
This technology has empowered developers to deploy scalable, enterprise-level applications at a fraction of the cost and without the conventional overhead. By unlocking the tools traditionally available to those with abundant resources, serverless technology continues to encourage developers to turn their ideas into a reality.


0 Comments